Relays
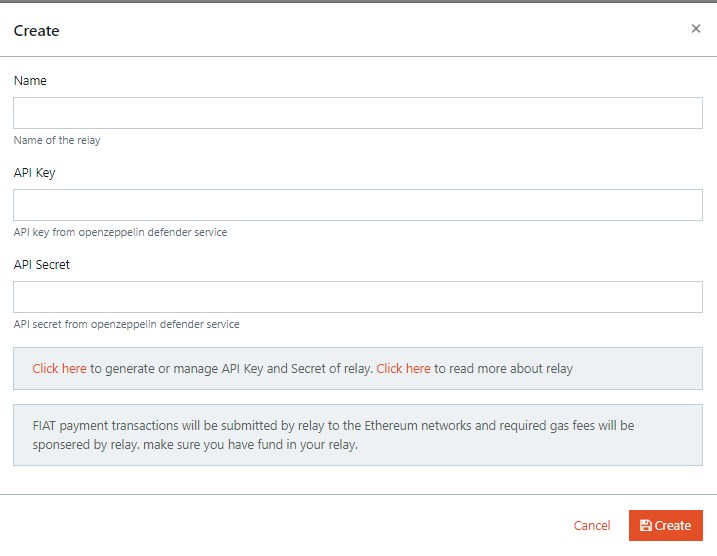
A relay identifies the blockchain network and allows users to make transactions through a regular HTTP API. The admin must follow the below steps to create relays:
- From the design console, navigate to Editor > Publish > Decentralized Collections.
- Click Modify from the Decentralized Collections.
- Click Create New available in the Relays. The user must provide the below information to create a relay.
- Name: The user must provide a suitable name to the relay.
- API Key: The user must provide the API key generated during the creation of Relayer in Openzeppelin Defender service. For more information, refer to OpenZepplin.
- API Secret: The user must provide the API Secret generated during the creation of Relayer in Openzeppelin Defender service. For more information, refer to OpenZepplin.
- Click Create to create a relay.
- Click Modify of the applicable relay to edit/update the information of the relay.
When the API and secret keys are regenerated, the information of the keys must be considered from the same OpenZepplin wallet account.
- Click
 symbol to delete the relay.
 A relay can be deleted only if there are no NFTs minted with that relay.
NFT Metadata Templates
Metadata is a set of data that describes other data. The NFT metadata describes its essential properties, such as its name, total supply, and transaction history etc. The admin must follow the below steps to create an NFT metadata template.
- From the design console, navigate to Editor > Publish > Decentralized Collections.
- Click Modify from the Decentralized Collections.
- Click Create New available in the NFT Metadata Templates. The user must provide the below information to create an NFT metadata template.
- Template Name
- Name
- Description
- Image URL
- Animation URL
- Attributes: The user can add/modify/delete the attributes based on the metadata requirement for an NFT. By default, the following attributes are available in the creation of metadata template.
- Token Id
- Serial Number
- Total Supply
- Click Create to create a NFT metadata template.
- Click Modify of the applicable NFT metadata template to edit/update the information in the template.
-
Click
symbol to delete the NFT metadata template.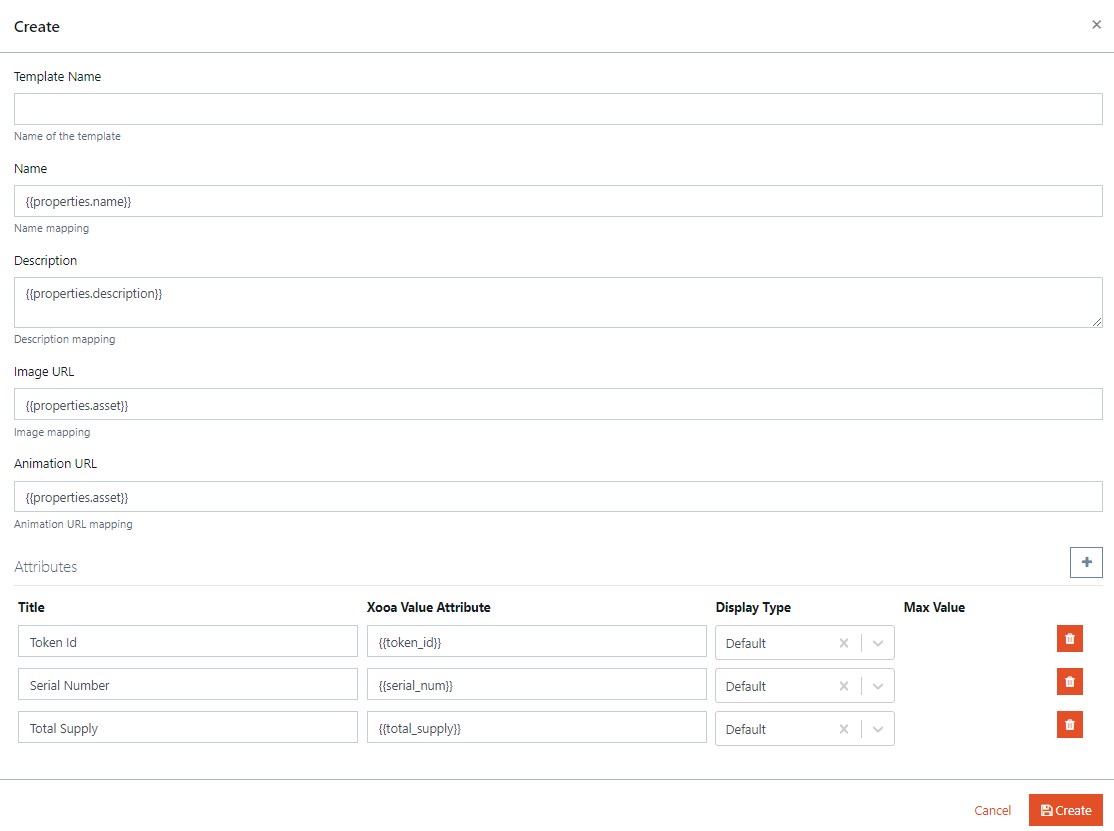
Global Collections
Global Collections allows the user to mint an NFT in the open marketplace. The blockchain created for global collection is used at an enterprise level. Initially, the user mints an NFT in a hyper ledger fabric blockchain. If the user wants to mint an NFT in the open marketplace, the user must select the applicable contract address from the Decentralized Collection dropdown list of the application during Mint Collectibles. After the first purchase of the minted NFT in the closed marketplace, the collection is created and available in the open marketplace.
The admin must follow the below steps to create global collections:
- From the design console, navigate to Editor > Publish > Decentralized Collections.
- Click Modify from the Decentralized Collections.
- Click Deploy Collection available in the Global Collections. The admin must provide the below information to deploy the global collections.
- Collection Name: Provide a suitable name for the collection.
- Symbol: Provide a unique symbol applicable to the collection.
- Description: Provide a suitable description to the collection.
- Collection logo: Upload a suitable logo to the collection.
- NFT Data Mapping Template: Select the NFT Data Mapping Template from the dropdown list. For more information, refer to NFT Metadata Templates.
- Relay: Select the Relay from the dropdown list. For more information, refer to Relays.
- Royalties: Click
 symbol to add Recipient (Account ID) and Secondary sale percent to the royalties.
- Click Deploy to add the global collection.
- Click View of the applicable Global Collection to view the information of the collection.
-
If required, click
symbol and click  toggle button to disable collection for minting.
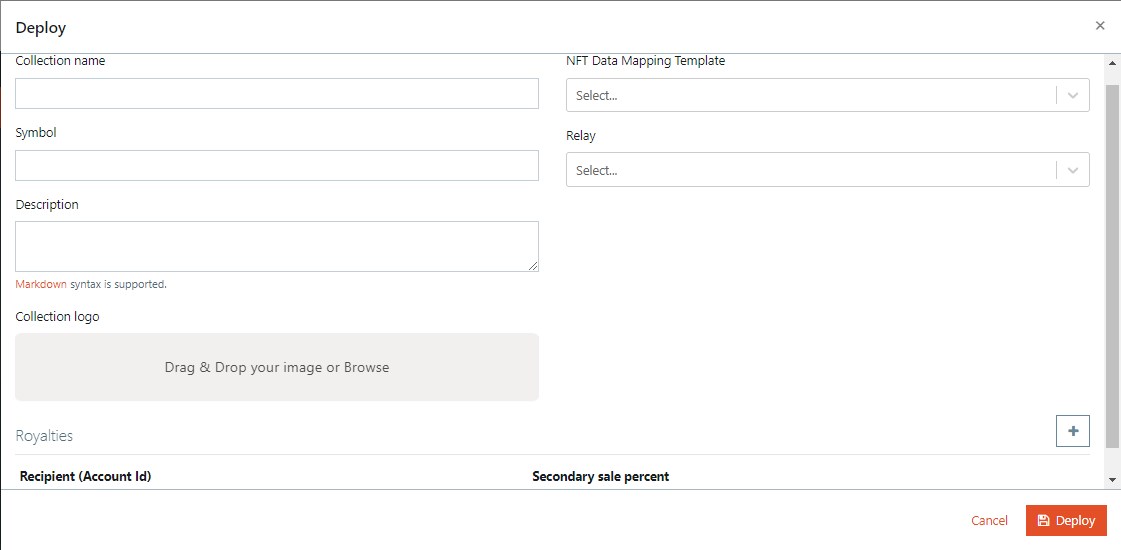
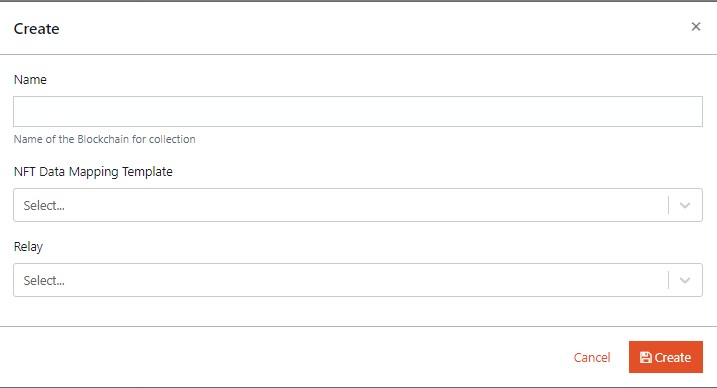
Blockchain for user created collections
The admin creates a blockchain for collections. The user can select this blockchain to create a specific collection of NFTs in the Create Collection page of the application.
Initially, the user mints an NFT in a hyper ledger fabric blockchain. If the user wants to sell an NFT from My Collections in the open marketplace, the user must select the applicable collection from the Decentralized Collection dropdown list of the application during Mint Collectibles. After the first purchase of the minted NFT in the closed marketplace, the collection is created and available in the open marketplace.
The admin must follow the below steps to map the relay and NFT data mapping template to create blockchain for user created collections:
- From the design console, navigate to Editor > Publish > Decentralized Collections.
- Click Modify from the Decentralized Collections.
- Click Create New available in the Blockchain for user created collections. The user must provide the below information:
- Name: Provide a suitable name to the blockchain.
- NFT Data Mapping template: Select the NFT Data Mapping Template from the dropdown list. For more information, refer to NFT Metadata Templates.
- Relay: Select the Relay from the dropdown list. For more information, refer to Relays.
- Click Create to create the blockchain for user created collections.
- Click Modify on the applicable blockchain to edit/update the information of the blockchain.
-
Click
symbol to delete the collection.