Create a Regular Drop
Prerequisites
- The user role must be a drop admin to access the Create Drop form of the application.
- If the user wants to purchase an NFT with crypto currency the admin must select the Enable Crypto Payments checkbox from Payments and Fees in the design console. The user must link the crypto wallet to the money wallet.
The drop admin can follow the below steps to create a regular drop in My Drops page.
NOTE
- The fields can be managed through a Create Drop form from the design console. The admin can drag and drop new fields or edit/remove the existing fields from this form based on the information required for an NFT. For more information, refer to Create Drop form.
- The drop admin must mint NFTs with Future Drop before creation of drop. For more information on minting NFTs, refer to Mint Collectible.
- Fields with an asterisk (*) symbol are a mandatory field.
- Click My Drops from the menu.
- Click Create Drop from the My Drops page.
-
Click the Regular option available in the Create Drop form. The drop admin must provide the following information:
- Click Create to create a regular drop.
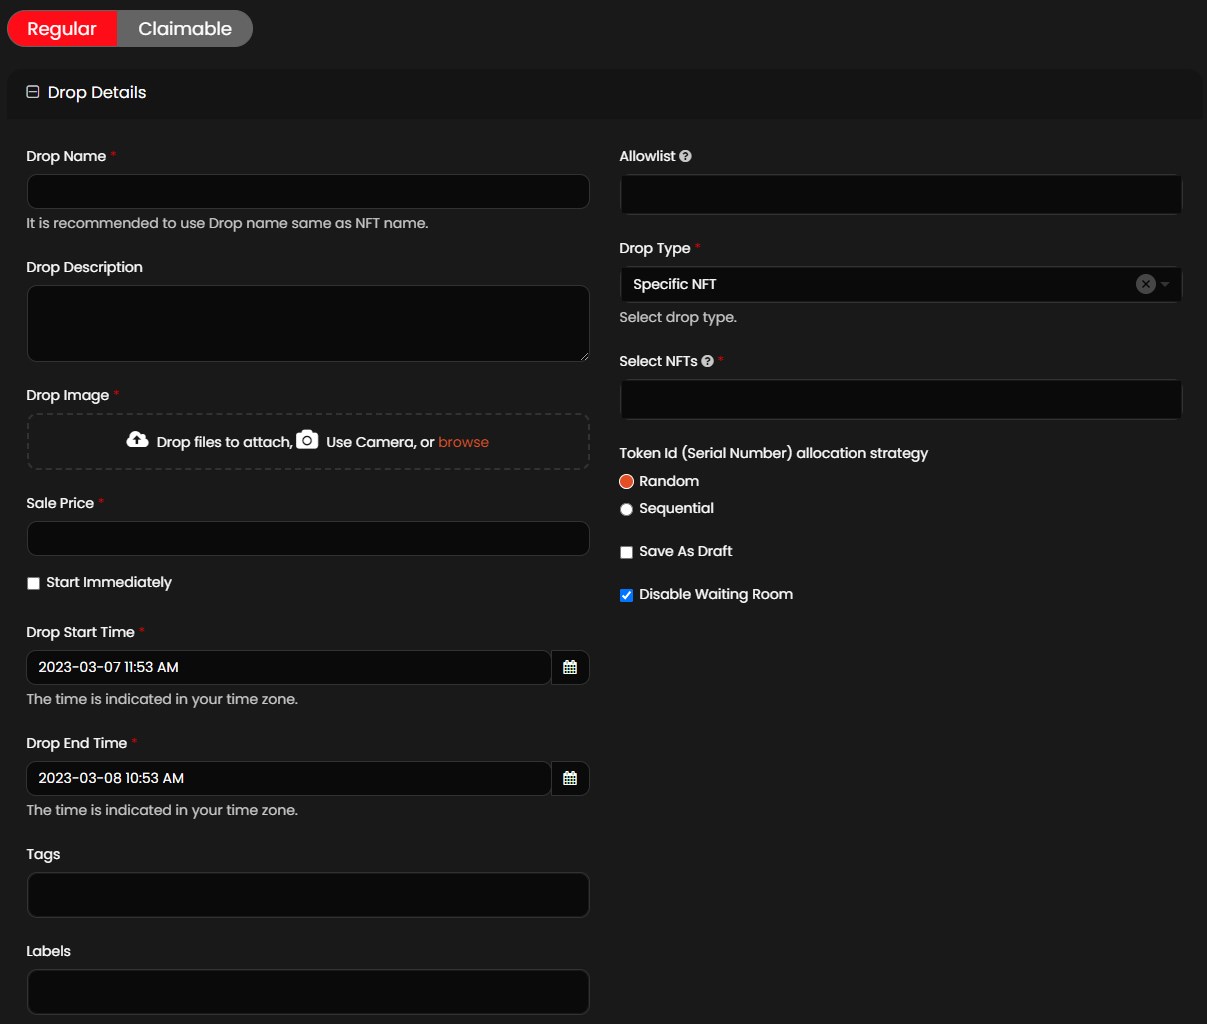
Drop Details
The drop admin must provide the following information:
- Drop Name*: The drop admin can provide a suitable drop name. It is recommended to use drop name same as NFT name.
- Drop Description: If required, the drop admin can provide a suitable description for the drop.
-
Drop Image*: The drop admin can upload the drop cover image by the following methods:
- Drop files to attach
- Use camera
- Browse
The maximum file size allowed to upload an image file is 1 GB.
- Sale Price*: The drop admin can provide the sale price of the drop in fiat currency (USD $).
If the admin enables crypto currency, the provided sale price in fiat currency is automatically converted into the crypto currency.
- Start Immediately: Select the check box if the NFT must be available immediately for sale after the creation of the drop.
- Drop Start Time*: Click the
 symbol or Drop Start Time text box to provide the start date and time for the drop. It indicates the date and time when the drop goes live to the public.
 Note
- The drop start time must always be ahead of the current time.
- If the Start Immediately check box is selected, this field is not displayed.
- Drop End Time*: Click the symbol or Drop End Time text box to provide the end date and time for the drop. It indicates the date and time when the drop ends for the public.
Note
The drop end time must always be ahead of the drop start time.
- Tags: If required, the drop admin can provide text in the Tags field to manage the visibility of drops based on information provided in the tags. Tags are used in drops (example: ‘special’, ‘low inventory’, ‘1-of-1’) to increase engagement, or conversions. Tags are also used to dynamically show or hide drops.
Note
The text in the tags must be unique.
- Labels: If required, the drop admin can provide text in the Labels field to display information about the drop, such as: ‘Flash Sale’, ‘Limited Edition Sale’ etc. The drop admin can edit or add labels to a live or scheduled drop to enhance sales.
Note
The drop admin can provide a maximum of three labels for a drop.
- Allowlists: If the drop admin wants to provide access to purchase NFTs to specific users, select the list from the Allowlist dropdown list. For more information on how to create a list, refer to Create a List.
Note
If the drop is accessible to all users, the Allowlist field must be empty.
-
Drop Type*: The drop admin must select one of the following drop types from the dropdown list.
- Specific NFT: Select this drop type if the drop admin wants to create a drop to a specific NFT.
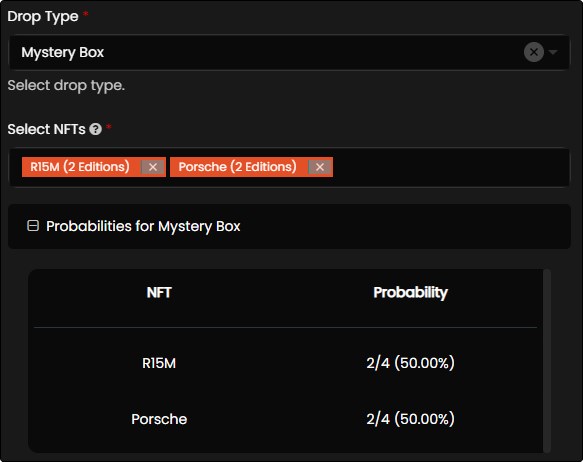
- Mystery Box: A mystery box drop contains multiple NFTs. The drop admin creates a mystery box which is a single drop with two or more NFTs, to which the drop participants are randomly allocated one NFT from the mystery box upon participation in the mystery box drop.
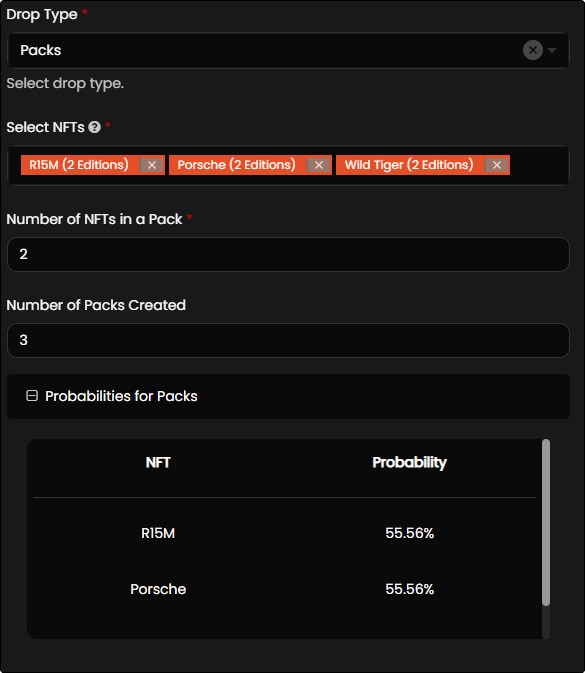
- Packs: A pack is a type of drop where the user gets more than one NFT. In packs, multiple NFTs are grouped together and sold as a group at once. The packs feature increases the user’s chance in receiving either a variety of NFTs or more editions of the same NFT.
-
Select NFTs*: The information added to this field is dependent on the drop type.
- If the drop admin selects the drop type as Specific NFT, the drop admin must select one NFT having single or multiple editions available from this field.
-
If the drop admin selects the drop type as Mystery Box, the drop admin must select two or more NFTs available from this field. Click Probabilities for Mystery Box to view the NFT and its probability details in the form of table.
-
If the drop admin selects the drop type as Packs, the drop admin must select two or more NFTs available from this field. These NFTs are randomly allocated within the packs and contain single or multiple editions of each selected NFTs. The below fields are displayed when the drop admin selects Packs as drop type.
- Number of NFTs in a pack: The drop admin must provide a value in this field. The number of NFTs in a pack cannot be less than 2. For example: If the drop admin has selected two collectibles with five editions each, then there are 10 editions in total. The drop admin must now enter a number that is divisible by two. If the number is not divisible by the number of editions, then an error message is thrown.
- Number of Packs Created: This field is automatically filled once the drop admin provides a value in the Number of NFTs in a pack.
Click Probabilities for Packs to view the NFT and its probability details in the form of a table. The probability percentage of NFTs allotted to each pack is automatically calculated.
Example of Packs: NFT A 100
NFT B 50
NFT C 10
160 Total Editions available for the packSelect Collectibles NFT A NFT B NFT C
Number of NFTs in a Pack = 8 - Total editions in Select Collectible should be divisible by this value
Number of packs created to be purchased by end users (Calculated value = Total Editions / Number of NFTs in a Pack) - 20
-
Token Id (Serial Number) allocation strategy: This field allows the drop admin to provide an allocation strategy for the purchase of NFT in the following ways:
- Random: Based on the number of editions minted for each NFT, the application randomly picks an edition of the NFT and the same can be purchased by user.
- Sequential: The application allows the user to buy NFTs in a sequential order.
Note
This field is displayed only when the drop admin selects Drops in Drop Type.
-
Save As Draft: Select the Save As Draft check box if the drop admin wants to save the information to the Create Drop form and publish the drop in the future.
Note
If the drop admin wants to publish the saved draft, the drop admin must click Publish available from the My Drops page.
-
Disable Waiting Room: Select the Disable Waiting Room check box if the drop admin wants to disable the drops information from the Drops page. If the Disable Waiting Room check box is not selected, the drop admin can view the details of the drop in the waiting room 30 minutes before the drop starts.
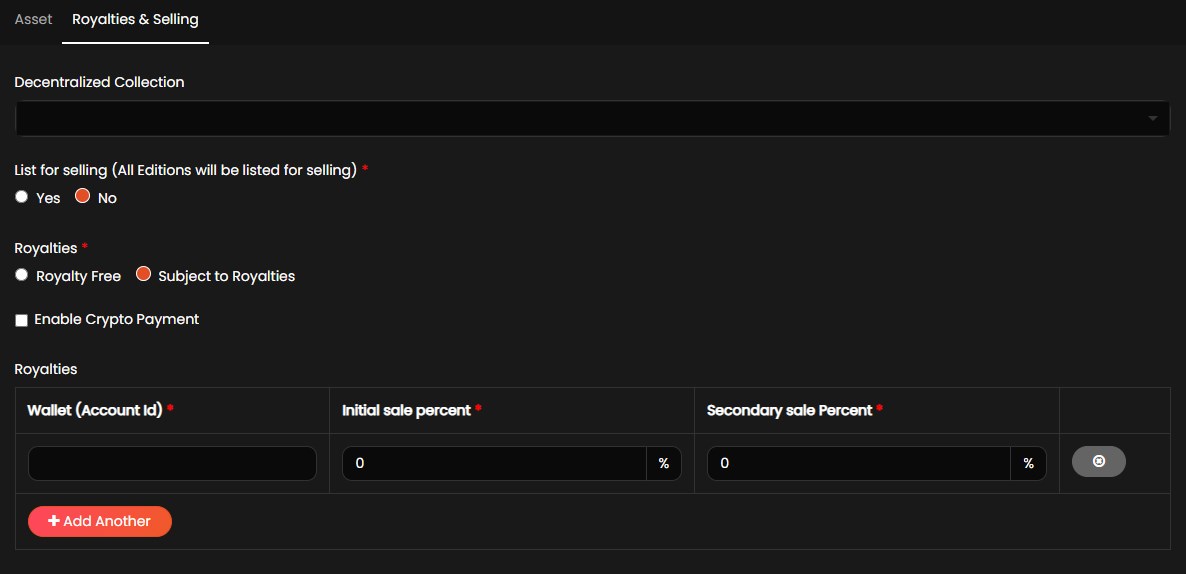
Royalty
A royalty is a legally binding payment made to an individual/organization who were responsible for the creation of the asset. The following options are available in this field:
- Royalty Free: The drop admin must select this option if no royalty is required for an NFT.
-
Subject to Royalties: The drop admin must select this option if royalty is required for an NFT. The following fields are available within this field:
- Enable Crypto Payment: The drop admin can select the Enable Crypto Payment check box if the user wants to purchase an NFT with crypto currency. If the drop admin does not select the Enable Crypto Payment check box, the user can purchase an NFT with fiat currency.
- Wallet (Account Id): The drop admin can provide a valid wallet address in this field. The wallet address is available in the Profile page of the application.
- Initial sale percent: This drop admin must provide a value in percentage that the seller must pay the royalty for the initial sale of the NFT.
- Click Add Another button to add multiple Wallet (Account Id) and Initial sale percent to the royalties.
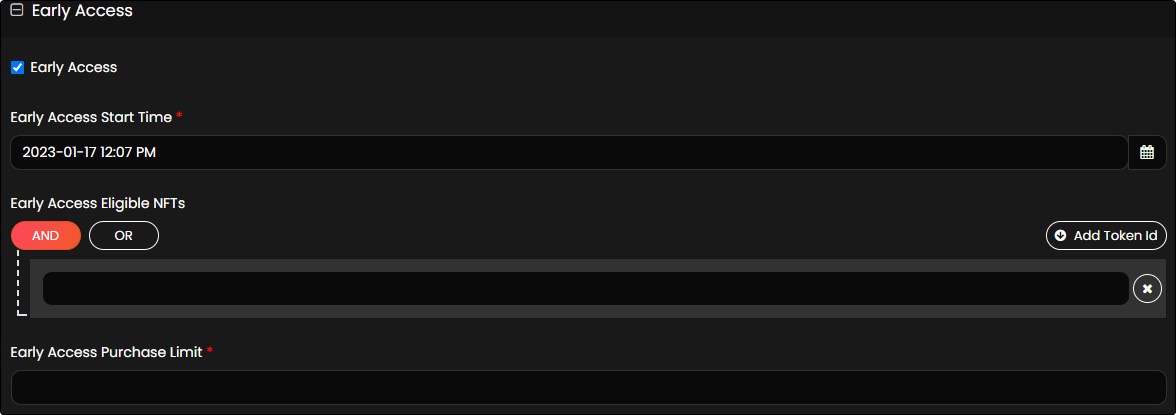
Early Access
An early access provides access to NFTs sale exclusively for specific users before the live drop begins to the public. To use the early access feature, the collectors must qualify the conditions provided by drop admin. The drop admin must follow the below steps to enable early access.
- The early access start time must always be before the drop start time and ends when the public drop time begins.
- The purchase limit and the number of chances given to the user per early access period are decided by the drop admin. Drop admins will notify, off platform, if a user qualifies for early access. When the user login to the app, they will see the Buy button enabled before the live drop begins indicating their eligibility to early access.
- Select the Early Access check box.
- Click the symbol or Early Access Start Time text box to provide date and time.
- Click Add Token Id and add the necessary NFT token ids which will decide the qualifying criteria for the early access.
- Click AND/OR based on the condition the user must qualify the user for early access.
-
In Early Access Purchase Limit field, the drop admin must provide a value which is used to limit the purchase of applicable NFTs during early access period.
Note
The limit value must not exceed the total number of editions in the drop.